All Pag-IBIG Fund members should be happy to know that they can now pay their monthly contributions through GCash app. All you need is a mobile phone where you can install GCash’s application. And of course, mobile data is also required.
We won’t be going through all the process of installing the GCash app so as creating your account on this post. This is another topic covered on a separate article. Thus, this tutorial assumes that you already have a GCash account.
So how do you pay your monthly Pag-IBIG Fund contributions via GCash?
Step 1: Make sure that you have enough balance on your GCash account to cover your required amount of contribution for the month.

Step 2: On GCash’s Main Menu, look for the Pay Bills icon and tap on it to proceed on the next menu.
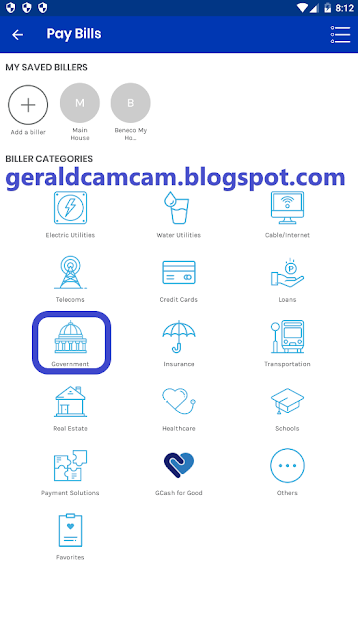
Step 3: The next menu contains a list of major services and utilities in the Philippines. Since Pag-IBIG Fund is owned and being operated by the Philippine government, you need to tap on the government icon.
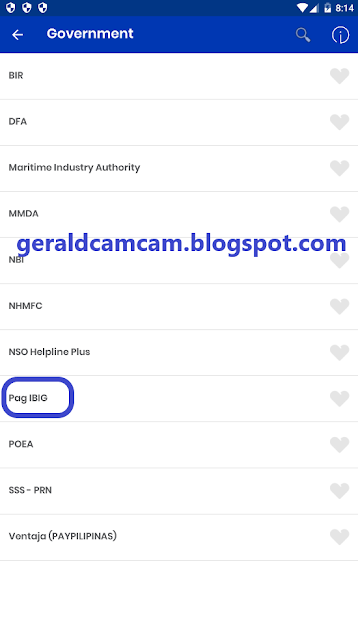
Step 4: Tapping on the government icon will take you into another list of menu. The list contains all government agencies and one among them is Pag-IBIG Fund. It is arranged in alphabetical order, thus, you might need to scroll the list up then tap on the Pag IBIG option when shown.
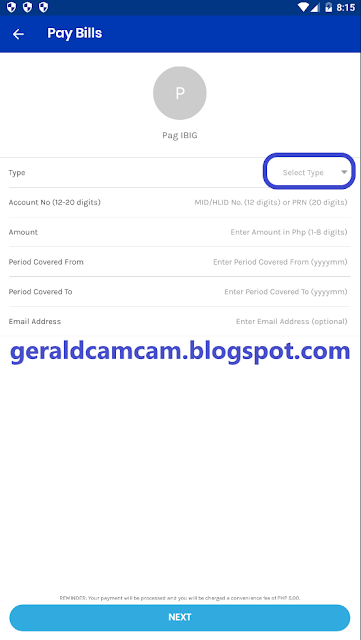
Step 5: The Pag-IBIG option takes you into a form where you need to complete. But before you start filling those required information, you need to select the type of what you are going to pay.
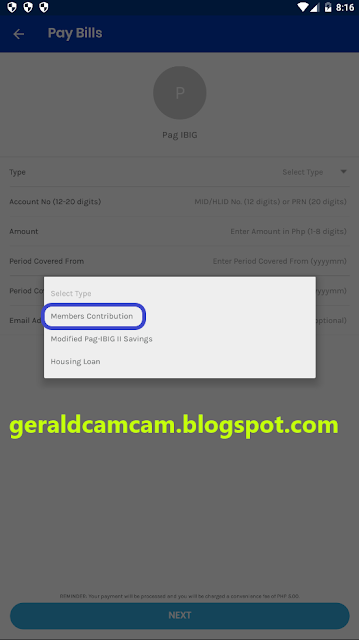
There are five types of Pag-IBIG Fund programs and they are the following:
1. Members Contribution
2. Modified Pag-IBIG II Savings
3. Short-Term Load
4. Calamity Loan
5. Housing Loan
Tap on the first option which is Members Contribution.
Step 6: Complete the rest of the form.
You must enter this following information:
Account No (12-20 digits)
- If you have MID or HLID number then you only need to enter 12 digits. But if you have a PRN number then, enter your 20 digits number.
Amount
- The amount is in terms of Philippine peso currency and you can enter 1 to 8 digits.
Period Covered From
- Year and month.
Period Covered To
- Year and month.
Email Address
- Entering your email address is optional. Thus, you can leave it blank if you want. But if you have decided to put your email address, your payment receipt will be send to your email.
Step 7: Proceed by tapping on the Next button. Please be aware that you will be charged an amount of 5 pesos for this transaction. This amount will be deducted from your balance and not from the amount that you will be sending.
Thus, do not put the exact amount that you will be paying on your GCash account or your whole transaction will fail due to insufficient balance. Put some extra funds on it, at least 5 pesos.
Step 8: Your payment will immediately be processed by GCash where it will show you the receipt. If you have not entered your email address back from step 6, you can download a copy of your receipt by tapping on the icon (arrow pointing downward) at the upper right most corner of your screen.
Moreover, always keep a copy of your receipt from GCash. Thus, I highly recommend putting your email address on the form from the 6th step. It really does come useful when something unexpected went wrong on your transaction. Anyway, such incident rarely happens but it is still best to be prepared.
We won’t be going through all the process of installing the GCash app so as creating your account on this post. This is another topic covered on a separate article. Thus, this tutorial assumes that you already have a GCash account.
So how do you pay your monthly Pag-IBIG Fund contributions via GCash?
Step 1: Make sure that you have enough balance on your GCash account to cover your required amount of contribution for the month.
Step 2: On GCash’s Main Menu, look for the Pay Bills icon and tap on it to proceed on the next menu.
Step 3: The next menu contains a list of major services and utilities in the Philippines. Since Pag-IBIG Fund is owned and being operated by the Philippine government, you need to tap on the government icon.
Step 4: Tapping on the government icon will take you into another list of menu. The list contains all government agencies and one among them is Pag-IBIG Fund. It is arranged in alphabetical order, thus, you might need to scroll the list up then tap on the Pag IBIG option when shown.
Step 5: The Pag-IBIG option takes you into a form where you need to complete. But before you start filling those required information, you need to select the type of what you are going to pay.
There are five types of Pag-IBIG Fund programs and they are the following:
1. Members Contribution
2. Modified Pag-IBIG II Savings
3. Short-Term Load
4. Calamity Loan
5. Housing Loan
Tap on the first option which is Members Contribution.
Step 6: Complete the rest of the form.
You must enter this following information:
Account No (12-20 digits)
- If you have MID or HLID number then you only need to enter 12 digits. But if you have a PRN number then, enter your 20 digits number.
Amount
- The amount is in terms of Philippine peso currency and you can enter 1 to 8 digits.
Period Covered From
- Year and month.
Period Covered To
- Year and month.
Email Address
- Entering your email address is optional. Thus, you can leave it blank if you want. But if you have decided to put your email address, your payment receipt will be send to your email.
Step 7: Proceed by tapping on the Next button. Please be aware that you will be charged an amount of 5 pesos for this transaction. This amount will be deducted from your balance and not from the amount that you will be sending.
Thus, do not put the exact amount that you will be paying on your GCash account or your whole transaction will fail due to insufficient balance. Put some extra funds on it, at least 5 pesos.
Step 8: Your payment will immediately be processed by GCash where it will show you the receipt. If you have not entered your email address back from step 6, you can download a copy of your receipt by tapping on the icon (arrow pointing downward) at the upper right most corner of your screen.
Moreover, always keep a copy of your receipt from GCash. Thus, I highly recommend putting your email address on the form from the 6th step. It really does come useful when something unexpected went wrong on your transaction. Anyway, such incident rarely happens but it is still best to be prepared.
No comments:
Post a Comment